Apple Won’t Handicap RCS. They Have Every Reason Not To Do So.

On November 16, 2023, Apple shocked the industry when they announced that the iPhone will be getting RCS support sometime in 2024. Since Apple proudly displayed earlier that they absolutely do not want to adopt RCS, this caught everyone off guard in a move that nobody could even dream of happening. Since Apple was previously so reluctant to adopting RCS, many people have been skeptical about how they will implement the standard. Will Apple do a lazy complience? Are they actually going to care? Before we answer these questions, let us look at why Apple is adopting RCS in the first place.

Why is Apple adopting RCS?

While it is currently unclear why Apple decided to adopt the new standard all of a sudden, most likely, they did it in response to new legislation from the European Union’s Digital Markets Act. You see, the European Union is debating whether or not to “required Apple to open up iMessage” (9to5Mac). Apple pushed back, arguing that “iMessage is not big enough to fall under purview of EU ‘gatekeeper’ competition law” (9to5Mac). Basically, the EU is thinking about whether or not to force Apple to open up iMessage and make it interoperable with other messaging apps, like WhatsApp. With regards to RCS, the main theory is that Apple adopted RCS to protect iMessage, since iPhone will be interoperable with various Android RCS messaging apps when Apple adopts RCS. RCS offers many of the same features as iMessage, so bringing this technology to the iPhone will allow Android and iPhone users to access these features when texting each other. Also, according to the Vergecast’s “Apple’s in on RCS — and everybody’s out on Bing” podcast, Apple announced that they were adopting RCS on the last day they can send appeals to the EU, further suggesting that Apple adopted the standard in response to the EU’s legislation. Because Apple is adopting RCS in reponse to the EU, many people have been skeptical on how Apple will adopt RCS.

People are saying that Apple will handicap RCS.

People on Reddit and other platforms have stated that they feel like Apple will handicap RCS in some way by taking away features or doing some kind of lazy compliance. People have stated that Apple has no reason to make a quality RCS experience on iPhone because it will de-value iMessage, one of Apple’s most effective strategies to lock their users into their ecosystem in North America. RCS offers many of the same features as iMessage, and therefore, iMessage could have less of an advantage.

Why Apple Won’t Handicap RCS

While it is understandable why these people feel this way, the evidence begs to differ. Apple confirmed to 9to5Mac that they “will work with the GSMA members on ways to further improve” RCS. “This particularly includes improving the security and encryption of RCS messages” (9to5Mac, Apple announces that RCS support is coming to iPhone next year). Clearly, Apple is trying to improve RCS and make it better than it currently is, which suggests that Apple is doing more than the bare minimum when it comes to adopting the standard. Apple clearly wants to provide their users with an even better RCS experience than what RCS is currently providing users, and they are working with the GSMA to make this happen.

Apple is also actively trying to fight against EU legislation with regards to iMessage. They do not want the EU to force them to open up iMessage, and Apple is probably using RCS as a strategy to make their case against the EU. If Apple wants to protect iMessage, they must play nice with the EU and actually make an effort to better the messaging experience between Android and iPhone. If they don’t, it will give iMessage a bad look.

Conclusion

Right now, it is very uncertain how Apple will adopt RCS. Many people have been skeptical, but Apple stated that they would try to make RCS better than it already is. Also, degrading the RCS experience on iPhone would only work against Apple in their fight against the EU because it would give iMessage a bad look. Soon, iPhones will get RCS, but until then, all we can do is just sit back, and travel through time.

Sources:
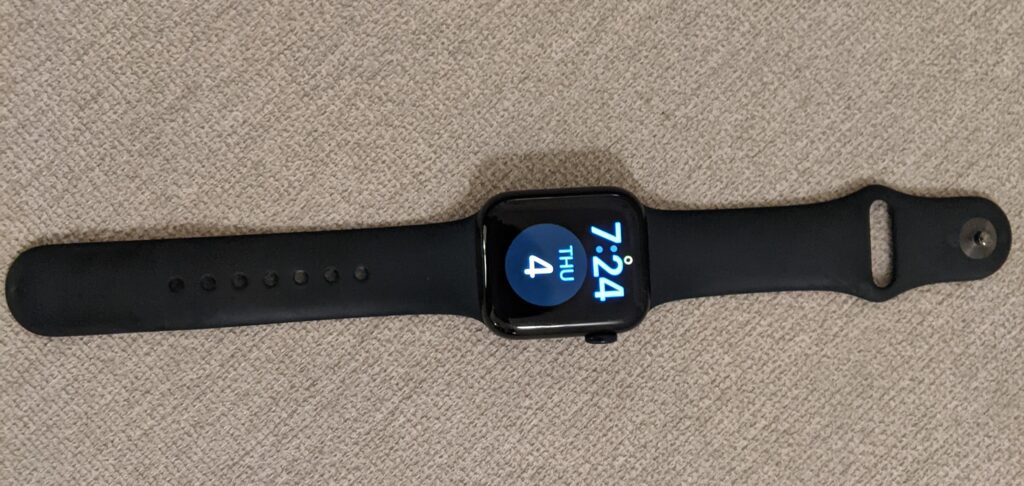
Apple Watch SE 2nd Generation Long Term Review

The Apple Watch 2nd Generation is Apple’s second and newest smartwatch of the Apple Watch SE series. I have been using it for the past six months, and I have got to know the watch pretty well.

Specs

The SE 2 uses the Apple S8 chipset, which has a dual-core CPU. It has a water resistance rating of 5 ATM, which means you can take it swimming and use it in the shower with no problems. It has a 296 mAh Li-Ion battery, which is bigger than the first generation Apple Watch SE. There is a WiFi and an LTE variant of this watch. The device has 32 GB of internal storage and 1 GB of RAM. It also has an accelerometer, a barometer, a gyro, a heart rate sensor, an always-on altimeter, and a compass, and it starts at 279 US dollars.

Design and Screen

The Apple Watch SE 2 is made of Aluminum, and it feels durable and premium. It has the exact same design as the first generation Apple Watch SE, and there is a 40mm and 44 mm option. The digital touch crown feels nice and clicky, and the watch itself has epic haptics. From the notification vibrations to the haptic feedback the digital crown provides, all the haptics are built with perfect precision. The screen is very clear and very responsive. The wobble on the touchscreen is very small, which makes the touchscreen very satisfying to use.

Performance and Battery Life

The performance is spectacular with the Apple Watch SE 2. Apps load really fast, and the experience is very snappy. All the animations and transitions are as smooth as ever. I never felt like anything took too long to load when using the watch. The battery life is also good, but not the best. After a full day, I’m usually around 50% battery when I go to sleep. I am usually awake for 15 hours, so you can use this for sleep tracking, but you would have to charge it in the morning.

There is one issue, though.

While the SE 2 is a fantastic watch, it still has it’s issues. The main issue I have experienced is that some of my notifications, such as reminder and Google Calendar notifications, were not coming. I am not sure what is causing this problem, but when I was using the Samsung Galaxy Watch Active 2 with my Pixel 3, I did not experience this issue. It is possible that the particular Apple Watch SE 2 that I have is defective.

Conclusion

The Apple Watch SE 2nd generation is probably the closest thing to a win-win-win smartwatch on the market. It has great battery life, fantastic performance, and all the apps you could ever want all for just 279 US dollars, and if you do a little shopping on Ebay, you could probably get it for even cheaper. With all of these advantages, I would highly recommend the Apple Watch SE 2nd generation to anyone using an iPhone.

Android Phones Should Have Kept the Headphone Jack

In 2016, Apple removed the headphone jack from the iPhone with the iPhone 7. Immediately, Android phone companies began advertising how their phone had a headphone jack, and the iPhone did not. Google made fun of the iPhone’s lack of a headphone jack when they announced the first generation Pixel phone at a San Fransisco Press event. However, both Google and Samsung would soon remove the headphone jack as well. Then, others would follow suit. Android phones should have kept the headphone jack because it would have been the strongest reason to buy an Android phone over an iPhone.

Why Buy an Android Phone Over an iPhone?

To the average consumer, the only big reason to buy an Android over an iPhone is the price, and even that is a little fuzzy. For example, you can buy an open box iPhone SE 3rd generation on Ebay for 230 US dollars, and you can buy a 2nd generation iPhone SE for as low as 150 US dollars. Many decent mid-range Android phones are in that price range, so might as well buy an iPhone SE, right? Other than the price, Android does not have any big advantages. Android phones are slower, more buggy, are not supported as long, and have less high quality apps than iPhones. There are many apps, like Twitter for Android, that have missing features, and others, like iTabla Pro, that are not available on Android at all. Apple also added a lot more customization to iOS, making Android’s customization advantages almost worthless for many people.

Having a Headphone Jack is a Huge Advantage.

If the main reason to buy an Android is to avoid expensive prices, what could companies do to convince more people to switch to Android? Well, they could add a headphone jack. Some people are quite satisfied with their bluetooth headphones/headsets, but many would rather use a wired headset/headphone because bluetooth headsets/headphones often have problems. Many bluetooth headsets/headphones fail to connect to your phone when you turn them on, or connect improperly. Also, connecting a bluetooth headset/headphone to a new device can be very time consuming because many of them do not connect successfully the first time. This can be annoying if you lose your bluetooth headset/headphone, and need to borrow your wife’s or someone else’s. You also have to remember to charge them, which most people do not want to do. However, with a wired headset/headphone, you just plug them in, and it just works. For these reasons, many people may find using a wired headphone/headset less of a headache, and would buy one phone over another just to have a headphone jack.

The ASUS Zenfone 10 Showcases the Power of the Headphone Jack.

While most phones have removed the beloved circular plug, some have not. The ASUS Zenfone 10 has a headphone jack, along with world class battery life and extremely good performance. It is also decently priced, at 699 US dollars. MKBHD claimed in his “This Phone is Nearly Perfect” video that he “never kills it in under 24 hours.” However, there are many other Android phones at a similar price, such as the Galaxy s23 and Pixel 7, which also have great performance and battery life. How can the Zenfone compete with the s23 and the Pixel 7 if it is priced so similarly to them? It competes with the addition of a headphone jack. While the Zenfone 10 has a headphone jack, both the s23 and Pixel 7 do not, and if you are going to pay 800 US dollars for an s23, might as well buy the high-performing $700 Zenfone and get a headphone jack.

Unihertz Jelly 2 Review After One Week

Unihertz Jelly 2 Review After One Month

       The Unihertz Jelly 2 is truly an impressive 3-inch device. It has a 3.5 millimeter headphone jack, a USB-C cable, a decent midrange Mediatek processor, and Android 10 despite being one of the smallest Android smartphones on the market. We have been using the Jelly 2 with T-Mobile for a week, and have tested aspects such as battery life, performance, and app compatibility

Built Quality and Ports

The Jelly 2 comes with a solid built quality. It has an extremely light reflective back, a fingerprint sensor, and a decent camera. On the front there are 3 haptic buttons which are used for navigation, a selfie camera, and speaker. On the right side of the phone there is a USB type-C port, a power button, and a red custom button. The volume up and down buttons are on the left side of the phone. On the bottom of the phone there is 1 speaker, and a microphone, and on the top we have a 3.5 millimeter headphone jack.

UI and Performance

       The Jelly 2 runs a lightly skinned version of Android 10. This skin just optimizes the operating system for the small screen. If you have used a Google Pixel phone, the phone’s UI will feel very familiar. The phone comes with basic features such as the Play Store, Google Assistant, the stock android settings app, and a camera app. Gesture navigation is automatically enabled on the Jelly 2, but the haptic buttons can still be used by default. We highly recommend using the haptic-buttons over gesture navigation because gesture navigation is very faulty on the Jelly 2. The performance has been flawless while performing daily tasks such as messaging, calling, and using Google Chrome. It was a little hard to use google maps on the small screen, but it still performs well. We watched some YouTube videos, which played very smoothly, but the screen size of the Jelly 2 makes it hard to look at for too long.

Carrier Compatibility Warning

       The Jelly 2 is only compatible with AT&T, Verizon, and T-Mobile according to Unihertz’s Ebay seller page. Click here to view: https://www.ebay.com/itm/164691966277?mkevt=1&mkpid=0&emsid=e11051.m43.l1465&mkcid=7&ch=osgood&euid=daf253edc88f4d23ba2276c5f0432071&bu=44860071496&osub=-1%7E1&crd=20210828232815&segname=11051&sojTags=ch%3Dch%2Cbu%3Dbu%2Cosub%3Dosub%2Ccrd%3Dcrd%2Csegname%3Dsegname%2Cchnl%3Dmkcid. In 2021, many carrier companies are planning to shut down their 3G and 4G lines soon. We tried setting up this phone with AT&T, but it was rejected. Even though the Jelly 2 is a 4G smartphone, AT&T recognized it as a 3G phone, and rejected it because they already stopped activating 3G phones. According to AT&T, this isn’t the only smartphone that gets miss-recognized as a 3G phone. We then tried T-Mobile, and got it to work with a 4G network, but still are unsure how long T-Mobile will support 3G and 4G smartphones. Please be aware that your connection might terminate soon.

App Compatibility

Another great feature about this phone is that a surprising quantity of apps are available on the Google Play Store. Apps such as google voice, Waze, Galaxy Wearables app, Samsung Accessory Service, and Roblox are all available for download. We have not come across any apps that aren’t compatible with the Jelly 2 yet.

Battery Life

The battery life on this phone is not the best. It is far lower than phones such as the iPhone 11 or the Pixel 5. We were able to get a little more than 30 hours of battery from this phone with extremely light use and battery saver on. All notifications were off except for calls, and we hardly ever checked the phone. Since this phone has fairly short battery life, this phone can clearly succeed in decreasing your screen time. You should not be on this phone any more than you need to.

Network Connection Issue

One small and rarely-occurring problem we have found with the Jelly 2 is that if we leave it on airplane mode for 2 hours or more, then turn it off, it may sometimes fail to connect to the internet. Although it still tells you how many bars you have on your cellular network, you can’t connect to the internet. What’s even more peculiar, is if you connect another device (such as a laptop) to your Jelly 2’s hotspot, the external device gets an internet connection while your Jelly 2 doesn’t. Thankfully, this issue doesn’t happen very often, but still make sure to carry another device when traveling.

How to install a Debian virtual machine on Android Phone

Installing Debian on an Android phone might sound challenging, but it is fairly simple. Thanks to the developer Pelya, we now have an application called “Debian noroot” available on the Play Store. This is a free and safe application that installs Debian automatically without any scripts, image files, or root.

The first step is to download the application from the Play Store via this link: https://play.google.com/store/apps/details?id=com.cuntubuntu. Install the application, then launch it. Some people have reported that they launched the application, and it gave them an error while Debian was starting. After a few days, they tried opening it again, and Debian started. If you have this error, do not uninstall the application from your phone. Keep it on your phone for a few days, then try starting it.

Why have Debian on your phone or tablet?

While there isn’t much you can do with this app, you can still run Linux commands, access desktop Chromium, and use Synaptic. With the Chromium browser, you have the capability to do anything you could do on your computer’s Google Chrome browser. You can install chrome extensions, watch videos, and more. It’s an incredible experience when using this virtual machine with a Bluetooth mouse and keyboard.

How to Install Windows 10 on Mac With Boot Camp Assistant

Apple’s built-in Boot Camp Assistance helps you install Windows on a mac. The process involves making a bootable disk partition or USB drive. Since Windows iso files are not bootable, Boot Camp Assistance makes it easy to make a bootable Windows install partition or USB drive.

What you will need:

– Windows 10 iso file

– The newest version of macOS

– USB drive depending on your version of macOS (this will be explained down below)

The first step is to get a Windows iso file from Microsoft. Visit this link to download the file: https://www.microsoft.com/en-us/software-download/Windows10ISO. If you want to download an older version of Windows 10, click the link here: https://tb.rg-adguard.net/public.php.

Now, open Boot Camp and click continue. If you have macOS High Sierra or newer, it will not require a USB flash drive, and will write the installer base system into a disk partition. However, if you have macOS Sierra or older, you will need a USB flash drive.

Once you have chosen your storage space for both macOS and Windows on Boot Camp, select your iso file, connect your usb drive if needed, then click continue. Your mac will now begin installing all the necessary file components from the internet.

When the install is finished, restart your mac. You will be automatically booted into the Windows installer base system. Select your language, agree to the terms and services, and choose your edition of Windows 10. One fantastic feature of installing Windows 10 on a mac is you get to choose your edition for free. When it asks you for a product key, look closely for the “I don’t have a product key” option at the bottom right

Once you reach the disk management page, click on the disk “BOOTCAMP” and format it. After this, click continue. It will now start installing Windows on your mac.

Once you’re finished, you will see the setup screen. When it asks you for a wifi connection and there is nothing there, skip it and go through the offline setup. This is because Boot Camp will optimize Windows 10 for your mac’s hardware after the setup, giving you wifi connectivity capabilities and much more.

Once completing the setup and Boot Camp installs, restart your computer. You should now have a fully optimized Windows 10 system on your mac.

Amtrak’s Sunset Limited from Los Angeles to New Orleans (Covid-19)

The Sunset Limited is one of Amtrak’s western long distance train routes. It travels between Los Angeles and New Orleans. Back in the 1990s, the train traveled to Miami, Florida, but then was cut short after Hurricane Katrina. This is not one of Amtrak’s most profitable routes, but it’s definitely worth the journey.

As of COVID-19, the train now leaves 3 times a week from Los Angeles at 10:00 PM, and New Orleans at 9:00 AM. All of Amtrak’s routes have changed their dining menu temporarily due to the pandemic. On the first full day of this journey, the train will take it’s time through the vast southwestern deserts of Arizona, New Mexico, and Texas. Many small stations will be in towns such as Benson, Lordsberg, and Deming. In El Paso, you will be able to see the Mexican border. For most of the first day, Interstate Highway 10 will be within sight from the train. The scenery will remain unchanged until just before Alpine, Texas, when glimpses of grass and mountain bushes appear as sunlight fades away.

The second day of the journey starts just before San Antonio, Texas, where large, ball-shaped trees emerge from the darkness. Southern houses, mobile homes, and farmland will pass by the train window. San Antonio, a smoke stop, is where the last two cars of the train uncouple from the Sunset Limited and join the Texas Eagle bound for Chicago. After San Antonio, the scenery will remain the same until Amtrak pulls into the small, humble little station of Houston. Houston Station features a very thin platform made of asphalt and an overhead cover. After passing through the suburbs of Houston, the train enters the bayou country.

The train will pass through beautiful bayou trees. Frightened frogs will jump in the water to hide from the train. As Amtrak rolls into Louisiana, more and more bayou will be seen. The train will pass through many freight train yards, and will have to wait for slow or fast moving freight trains to pass through.

The sun slowly starts to dip towards the horizon as the train nears New Orleans. More and more houses and freight yards are seen as the Sunset Limited pulls into the small ominous station of New Orleans.

New Orleans is a huge junction for freight trains. These trains include CSX, Norfolk Southern, Union Pacific, and a special one: New Orleans Public Belt, which all own railroad property around this area. Amtrak’s eastern style train cars and western superliner cars can all be seen at the New Orleans Train Station. For railfans, New Orleans would be one of the best places to visit.

How to Install Windows 10x on Regular Computer

This tutorial will explain how to install Windows 10x on a Hyper-v virtual machine. Hyper-v is a virtual machine application that is built into Windows 10. An underdeveloped version of Windows 10x recently leaked, so there will be some glitches and unexpected errors. Please do not use this as your primary workspace.

Operating system requirements for Hyper-v:

  • Windows 10 Enterprise
  • Windows 10 Pro
  • Windows 10 Education

To view the full list of system requirements, visit Microsoft’s list here:

https://docs.microsoft.com/en-us/virtualization/hyper-v-on-windows/reference/hyper-v-requirements

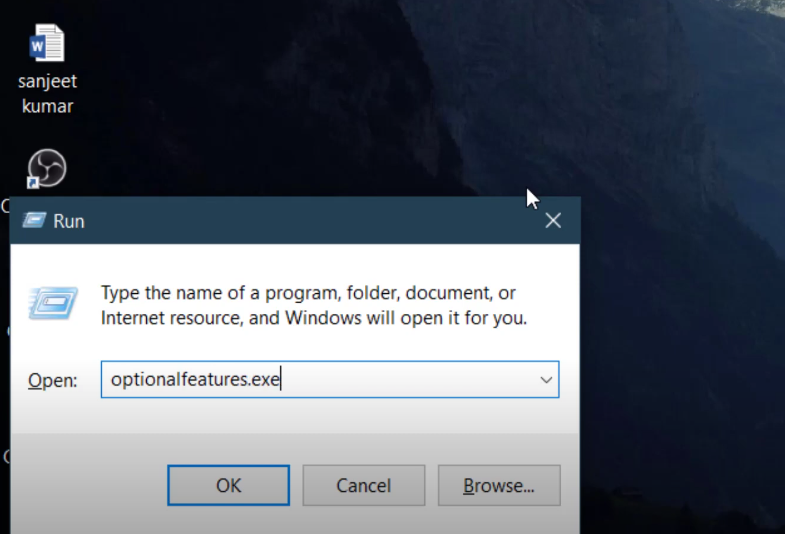
The first step is to enable Hyper-v. To do this, go the windows search bar, and type in “features,” then click on “turn windows features on or off.” Look for Hyper-v, and check it. Make sure all the sub-folders of Hyper-v are checked too. After clicking “OK,” it will take a while to install Hyper-v. After it installs, it might ask you to restart.

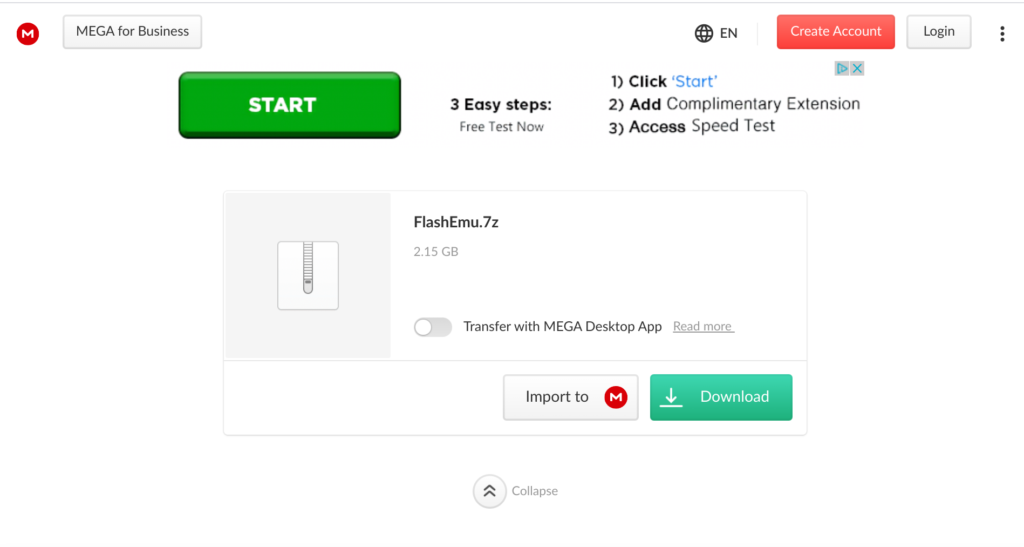
Once Hyper-v is successfully installed and opened, the next step is to download the Hyper-v install image which is titled “FlashEmu.7z.” You can download this file from Mega.nz: https://mega.nz/file/vzp2VKiT#4wts9eC1wXushqNBwgZfsYIhXsHwWFY2skHMkeqib7I

After this file is finished downloading, make sure you have winRAR installed. If you have this application, right click on the file and click “extract here.”

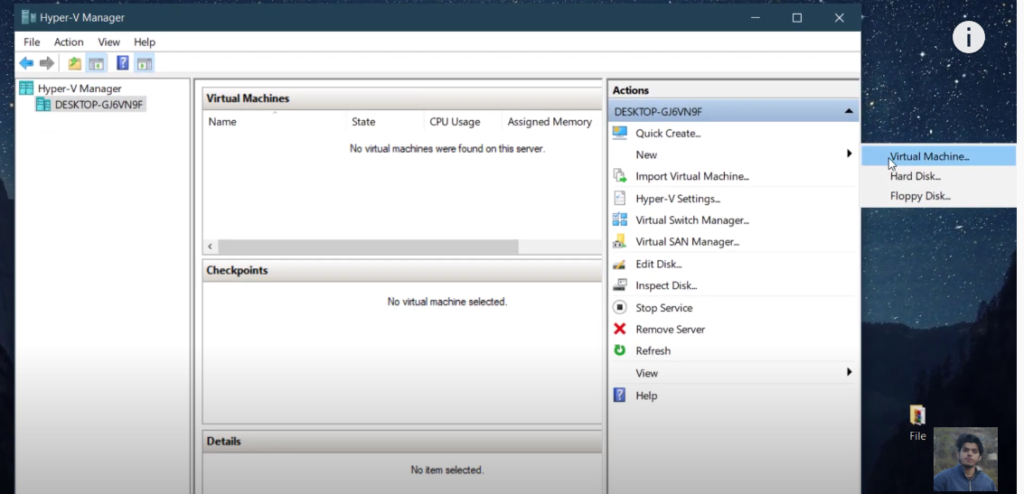
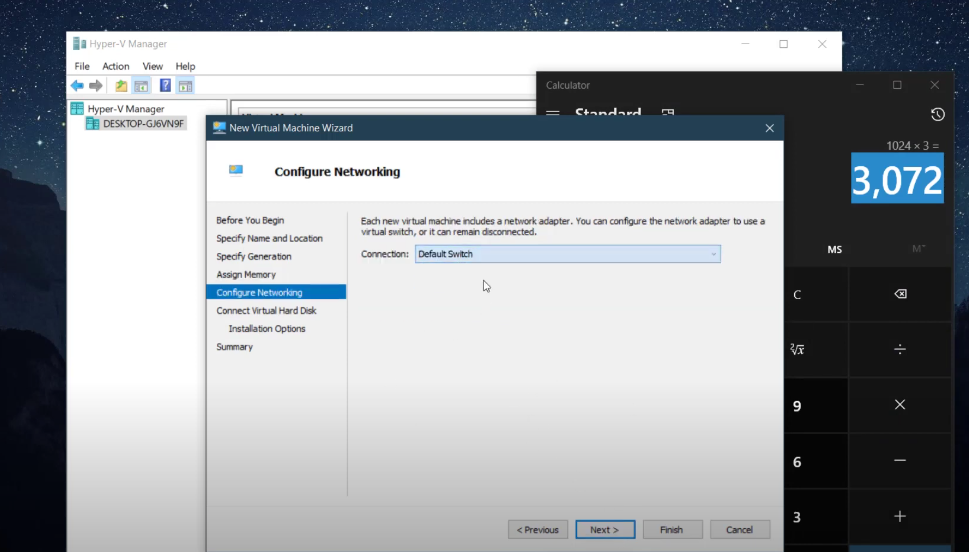
Now, open Hyper-v, hover over “new” towards the right, and click “virtual machine.” Click next, and name your virtual machine, then select “generation 2.” After heading to the next page, specify the amount of ram you would like your virtual machine to have and check the dynamic memory box. For network connection, switch it to default switch. From here, proceed to the next page and click “use an existing virtual hard disk.” Select the flash VM image and finish the setup.

Source: Tech Sanjeet (YouTube Channel)

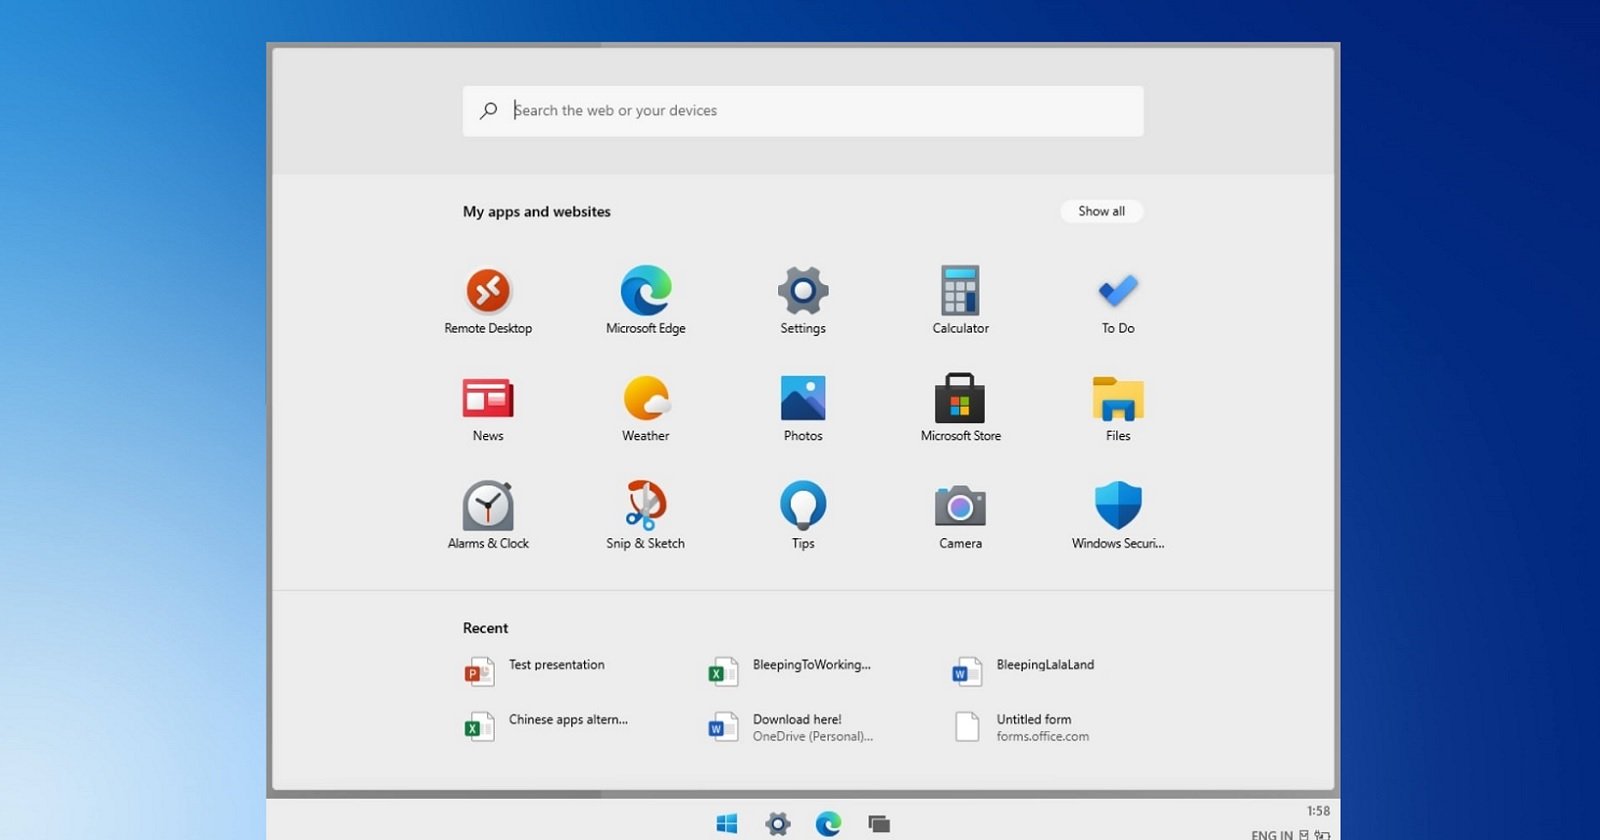
Now, right click the virtual machine and select “connect.” Your virtual machine should begin booting at this point. It takes about twenty to thirty minutes to boot for the first time. When it’s close to being done, you should see a windows 10x logo on the screen before entering the setup. You have now successfully installed Windows 10x on your PC.

Windows 10X: A closer look at Microsoft's new operating system

Source: Tech Sanjeet (YouTube channel)

Tech Sanjeet YouTube Channel link: https://www.youtube.com/channel/UC_7Ulu2-XHUDudpp4C7N-iw

A Drive to Yellowstone National Park

Yellowstone is a heavily traveled place by tourists. It has many things to do, like hikes, hot springs, and wildlife. Driving there can also be an experience. One of the most interesting drives is from Los Angeles to Yellowstone National Park. The drive is from the deserts of Southern California, to the grasslands of Utah and Idaho, and then the coniferous forest of the national park.

The first part of the drive is the popular route from Los Angeles to Las Vegas. This is not a very exciting drive for many people, and has dry desert brush scattered along the dry soil. Further up north of Barstow, CA, small Joshua trees start sprouting up from the ground. The landscape will start to become more and more grassy after passing Las Vegas, and the elevation will slowly start increasing from here.

After entering Utah, mountains will arise on both sides of the freeway, and the shrubs will start to change shape. Eventually, the desert brush will become small coniferous bushes surrounded by dry golden grass. In the winter, there might be snow on both sides of the freeway. Horse ranches will emerge, and so will rolling hills and mountains

The scenery will be somewhat the same until passing through Salt Lake City. After that, the Rocky Mountains emerge as the elevation continues to rise. In the summer, this area is very green and thriving with lush grass. A little patch of farmland will be covered before entering Idaho Falls. Here there are many restaurants near the Snake River, and might be a great stopping point to get gas and gather up food for the next leg of the journey.

After Idaho Falls, Interstate 15 is left and a mountain road crosses the border into the national park. This is by far the most beautiful part of the Journey. In the summer, green grass will surround beautiful coniferous trees. One great place to drive through is Lamar Valley where many Bison and Elk like to graze peacefully. A bear might be spotted in mountains and along roads.

This is truly an extraordinary journey and a great way to see the country. It’s an interesting sight to see the scenery change so gradually. From the deserts of Southern California to the coniferous and grassy landscape of Yellowstone National Park. It’s hard to notice how different each landscape is from each other until you really think and remember.

Los Angeles to South Lake Tahoe, CA

Los Angeles to South Lake Tahoe, CA

        Driving from Los Angeles to South Lake Tahoe is a breathtaking experience. This is about an 8 hr drive. First you will have to drive through Sacramento. Many people might have already taken that route to visit San Francisco, but some may have not.

Driving to Sacramento

       There are many ways to get to South Lake Tahoe from LA, but this article will talk about interstate route 80. In order to get to route 80, we need to drive through Sacramento. Most of the drive will be farmland, but some parts are quite interesting. Before you get to the farmland, you will be driving through beautiful mountains. These mountains have breathtaking views, and also have hiking trails. After that there will be farmland, but don’t let that ruin your trip. There is much more to see after the farmland. For a little while, you will be driving through beautiful fluffy rolling hills with golden grass growing on them. After the beautiful scenery, there will be more farmland, but that’s only as you get closer to Sacramento. After you reach Sacramento, you can merge onto the 80. This is where the journey gets interesting.

Driving through the mountains

Interstate route 80 is a cross country highway, which means it stretches from the west coast to the east coast. It starts from the bay area, and ends in New York city. This is the route that will be taken from Sacramento to South Lake Tahoe. This is a mountainy drive which is filled with beautiful pine trees, and in the winter time, snow! There are many detours in these mountains that can be taken to explore the snow.

       Once you exit the freeway, there are mountainy twists and turns in the roads, and as you get further away from the freeway, you will be able to see the lake. There will be small houses and neighborhoods you will pass by on your journey.

       Once you reach your destination, there will be a small pizza restaurant that you can eat at. Then, off to your hotel.

Here is a link for South Lake Tahoe city:

https://www.google.com/maps/place/South+Lake+Tahoe,+CA+96150/@38.9227254,-120.013534,12207m/data=!3m2!1e3!4b1!4m5!3m4!1s0x80998589eea54fe1:0xdd1b2f46fb23918e!8m2!3d38.939926!4d-119.9771868